Blacksmithing
and Cutlery
by Gérard HEUTTE


|
|
 Improvement of an oven for tempering

|
This article presents the modification of a domestic oven.
For tempering, I have long used a kitchen oven (bought on a flea market). In the interests of
accuracy, I checked the temperatures... And big surprise there! In summary:
> Difficulty of fine adjustment. As the temperatures used for tempering are between 200°C and
250°C, the adjustment range is concentrated on a bit more than a graduation of the thermostat!
> Poor temperature stability (+/-15°C around the mean/set), due to thermostat hysteresis (a lousy
bimetallic element).
So I decided to improve this oven using an electronic thermostat.
Attention to your safety:
> There's AC 220V and the temperature of the oven can reach 300°C (and more
for heating elements). If you do not have the appropriate knowledge to carry out this project, it is
careful to refrain!
> Domestic furnace resistances are insulated. For this reason, the use of a single SSR is correct.
If the resistance of your oven is not isolated, you need to put two SSRs to disconnect the two ends
of the resistance.
 Equipment
I chose for that a REX C100 kit, ordered on internet (ebay) for a small fee (<20€).
The kit includes:
> REX C100 temperature controller Module
> SSR (Solid State Relay) 40A
> K thermocouple
For the C100, remember to check the voltage (220VAC) and the output type (SSR).

C100 front face.
PV = Process Value = Measured Temperature
SV = Set Value = Set Temperature
|
|

C100 label.
Remember to check indications!
|

C100 Pin allocation.
|
|
 
SSR and Thermocouple.
|
 Preliminary checks
Before final installation and the work, it is better to make a few simple checks.
Safety Warning: Always work off, with the power outlet disconnected!
Apply power
> Connect the C100 to the mains via terminals 1 and 2.
> Check that the display is OK.
> SV default value is 150°C.
> Disconnect the C100 from the mains.

Display at power on
(lasts a few seconds)
|
|

Initial display
PV = "oooo" ; Indicates a thermocouple fault (normal because not yet connected)
SV = "150" : Default set
|
Temperature sensor
> connect the thermocouple via terminals 10 (red terminal = "+") and 9 (blue terminal
= "-") to the C100.
> Power the C100.
> Check that the display "PV" displays correct room temperature.
> Verify the accuracy of the measurement by dipping the probe into a glass filled with ice
(temperature 0°C).
> Verify the accuracy of the measurement by dipping the probe into a pot of boiling water
(temperature 100°C)..

Thermocouple connection
|
|

Ambient temperature
|

Ice temperature
|
|

Boiling water temperature
|
SSR (Solid State Relay
> before connecting the SSR, check the output voltage of the C100 by placing a voltmeter between
terminals 4 (+) and 5 (-) of the C100.
> If the output is active "out" led alight on the front face of the C100), the output voltage must be
high enough to command the SSR (typicaly 10 to 18VDC).
> Set SV to "10" (or any value below room temperature) to disable the compmand of the SSR.
> The output voltage must be to low to command the SSR (typically less than 2VDC).
If these checks are positive, make the connections between the command of the SSR and the C100:
> Terminal 4 of the C100 to the "input +" of the SSR
> Terminal 5 of the C100 to the "input –" of the SSR
> Power on the C100.
> Check that the SSR does not switch on (LED off) (reminder SV = "10")
> Set SV to a high value (here "220") and verify that the static relay switches on (LED alight)

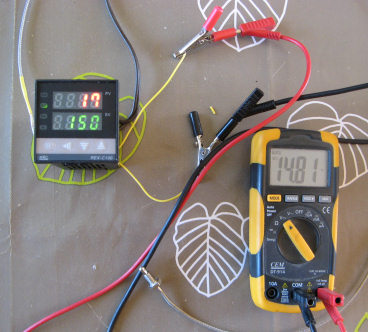
SSR command voltage measurement (SSR activated)
Measured voltage = 14,81VDC
|
|

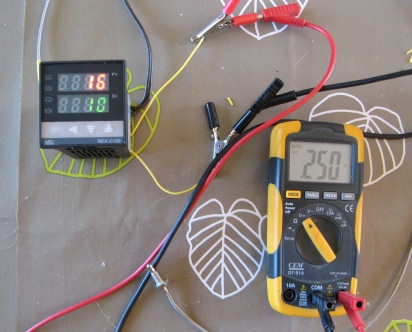
SSR command voltage measurement (SSR not activated)
Measured voltage = 0,25VDC
|
 Preliminary test
To verify that everything works correctly:
> Temporarily connect a female mains plug on the output of SSR to be able to command a load
(See diagram at the end of this page).
> On this output, connect the oven (ON and with the thermostat set to the maximum).
> Insert the thermocouple by the door ajar.
> Power on the C100.
> Check that the temperature rises to the setpoint.

Test installation during heating
|
|

Effective regulation!
|
 Installation

The final installation is to bring together in one housing all equipment, including the oven
(stripped of its archaic control box!).
The wall was pierced to allow to spend the thermocouple sheath which will be set in the oven
through a bracket (see opposite picture).
The timer was recovered from the original oven (an electronic timer of B3S kind costs
about 30 € on ebay). A timer is useful to avoid forgetting a blade in the oven, or allow to
do something else without risk!
The assembly was inserted into a specific package made of 18mm MDF.
 
Front face with the timer and the C100 module
|
|
 
Back face. It serves as a radiator for the SSR,
although it heats little...
|
 Start-up
After installation, make a "autotune" (automatic calculation of control parameters):
> Power on the oven,
> Adjust regulator with vertical arrows for SV = 220 (or the most frequently used value),
> Press "set" for several seconds,
> Press "set" to display  , ,
> Switch the setting from 0 to 1 with vertical arrows,
> Press "set" to confirm,
> Let it run while the "AT" light flashes,
> At the end of autotune (which can take some time), the controller automatically returns to normal
mode.
 Final result
There it is!

General view of the modified oven
The rack has been customized by adding a grid to avoid the fall of the blades on the bottom
heating element.
The setpoint can be adjusted with one degree resolution and the stability is excellent
(about +/-1°C) : Nothing to do with the original oven!!!
 Wiring schematic

| | |


