
Blacksmithing
and Cutlery
by Gérard HEUTTE


|
|
 Making a counterbore cutter

|
 On folders with a wood handle, it is preferable to use washers to caulk the axis without
splitting the wood. The disadvantage is that washers (even very thin) exceed and create a
relief unpleasant to the touch.
On folders with a wood handle, it is preferable to use washers to caulk the axis without
splitting the wood. The disadvantage is that washers (even very thin) exceed and create a
relief unpleasant to the touch.
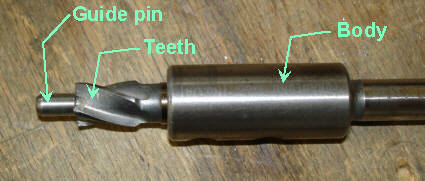
If you want to fit washers, it is necessary to have a counterbore cutter (see picture opposite).
Then it is possible to create an housing of the size of the washer.
The cutters of the trade are seldom at the right dimension.
Here is a way to make a counterbore cutter. It takes about two hours of actual work.
Principle
A counterbore cutter has a guide pin, which serves to guide the cutter entered into the hole.
Above this pin, the teeth can dig housing.
A counterbore cutter is defined by two key parameters:
> Diameter of the guide pin.
> Diameter of the housing.
For my application, I need guide pin of 3mm and a housing diameter of 8mm.
These dimensions match the washers that I own.
Materials and equipment
 The required equipment is present in most of workshops:
> Drill press and drills.
> Files.
> Saw for metal.
> Something for hardening ...
For materials, two rods are required. For the guide pin, I used a nail of 3mm.
For housing, I used a rod of 8mm in XC48 (1050) steel that was available.
Preparation of the cutter
> Cut the rod of 8 to the desired length. 40 mm in length is correct.
> Sand one end of round 8, taking care to keep the area well orthogonal to the axis of the rod.
It is here that the future teeth will be carved.
> Sand roughly the other end and bevel the edge.

Flat sanding of a end of the rod of 8.
|
|

View of the sanded surface.
|
Drilling guide pin housing in the rod of 8
This is the touchy part !
> Secure a quite thick (30mm) block of wood on the support of the drill press.
> Drill completely through the block with a drill to 3. The hole should be deep enough to
maintain a vertical drill.
> Lock the rod of 8 in the drill mandrel.
> Engage a drill tip upwards in the hole. make it exceed by height of about 10.

Secure the wood block on the drill press support with two clamps.
|
|

Drill the wood with a drill of 3.
|
|
Install the drill. here it exceeds to much. It must be sank more.
|
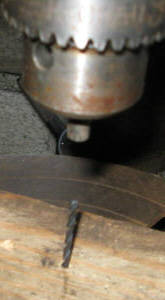
> Keep a firm hold on the drill with a pair of pliers and a piece of leather just above the wood.
> The drill must exceed the plier by a few millimetres. With more, the flexibility of drills does not
allow a correct centering!
> Drill the rod of 8 : It turns and the drill is fixed! Drill a few millimeters deep.
> Raise drill a few millimeters and continue drilling. Repeat this procedure to get a depth of 10 or 11 mm.
With this method, the axis of round 8 and the hole are coaxial!

Pliers holding the drill to prevent rotation.
|
|

General view of the system.
|
|

The result.
|
Usinage des dents
> Split the rod of 8 in four parts. Each cutting-line must have a slope of 45°.

Splitting the rod of 8 with the saw.
|
|

The rod of 8 split in four.
|
The result is far from perfection, but I did not want to start all over again!
> Cut each quarter-round so delimited with file. The angle of 45 degrees must be maintained.
> Continue until the edge of the tooth appears.
> Make the four teeth.
> Beware the orientation of the teeth!

Shaping a tooth with the file.
|
|

Two tooth are made.
|
|

The four tooth.
|
Hardening and assembly
> Harden the rod of 8 on a few millimetres.
> Make an tempering.
> Polish and sharpen teeth.
> Cut the guide pin at the right length. It must exceed a few millimeters at the end.
> Bevel each side.
> Scratch one end with file to strengthen the gluing.
> Glue with epoxy the guide pin in the hole on the rod of 8.

The tooth after hardening and and sanding with 240 grit.
|
|

The counterbore cutter after final assembly.
|
The white fibers are left-overs of paper towel...
Tests
It only remains to test, to verify the cutting quality and the geometry of the housing.

The final result in pear tree wood.
|
|

The same with the inserted washer.
|
| | |