
Blacksmithing
and Cutlery
by Gérard HEUTTE


|
|
 Make a thingummy for folder

|
The mechanisms of folding knifes (even simple one as the
Piedmontese) are not always easy to visualize and even less to
design. Here a small quite useful gadget. It makes
possible to draw the blade and the handle of a folding knife and to rotate the blade around
the axis to correctly visualize the closed and open positions.
Realization
First of all, here is what this gizmo looks like:

This gadget comprises the following elements:
- A plywood small plate of approximately 300x120mm.
- A sheet with reference marks. It is easy to make with
any advanced drawing sofware. You can also use a
squared Bristol-board, a rule, a compass and a fine pen.
- An axis of rotation. Here, I took a nail of diameter
5. It is the diameter of the screws which I
generally use like axis for my folders.
- Transparent adhesive film.
 Then, with all these elements:
- Stick the sheet with the reference marks on plywood.
- Pose over the transparent adhesive film which plays the
part of protection.
- Cut the film surplus on the circumference of the small
plank.
- Drill the center of the reference marks to the diameter
chosen for the axis.
- To stick the axis so that it exceeds by a few millimetres.
And it is finished!
Opposite, the central area with the concentric reference marks
and the axis.
 Furthermore, you need some essential accessories:
- Parts of rigid transparent film of approximately 150x50 and
pierced with a hole of the diameter chosen for the axis. This
kind of film is usually used to protect the binded documents.
- An indelible felt pen (like those for CDs). For
corrections, to use a cotton bud soaked with alcohol.
To drill these films easily, I stack some much between two
small planks. I tighten the sandwich with two screw clamps.
Then, I drill the complete stack with a drill press: Easy,
clean and net...
Use
When I make a folding knife, I always start by forging the blade. Having the practice
of Piedmontese, I drill the hole for the axis directly (from 40 to 45% from the bottom
of the height of the blade).
I completely finish the blade (Hardening,
tempering, polishing) before starting the design of the handle...
 1 - Transfert the profile of the blade on a
transparent film. It is a little hard with Piedmontese
with flat pallet. But with the practice, you will succeed.
I place all on the left a small reference mark to
keep the position of the blade in open position. On the
photograph, the blackened part corresponds to the profile of the
pallet.
1 - Transfert the profile of the blade on a
transparent film. It is a little hard with Piedmontese
with flat pallet. But with the practice, you will succeed.
I place all on the left a small reference mark to
keep the position of the blade in open position. On the
photograph, the blackened part corresponds to the profile of the
pallet.
 2 - I prolong the profile of the ricasso on the
transparent film reserved for the handle. I use these two lines
as a guide for the design of the handle and to have a correct
width for the spacer.
2 - I prolong the profile of the ricasso on the
transparent film reserved for the handle. I use these two lines
as a guide for the design of the handle and to have a correct
width for the spacer.
 3 - I place the blade in closed position and I place a
new reference mark.
3 - I place the blade in closed position and I place a
new reference mark.
 4 - I trace the lower part of the spacer which
corresponds to the profile of the edge of the blade. See
opposite the result.
4 - I trace the lower part of the spacer which
corresponds to the profile of the edge of the blade. See
opposite the result.
 5 - I finish the outline of the handle. It is
necessary to take care of the width of the spacer, which must be
sufficient to ensure a strong handle.
5 - I finish the outline of the handle. It is
necessary to take care of the width of the spacer, which must be
sufficient to ensure a strong handle.
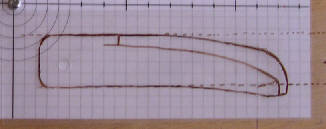 6 - I directly have templates for the spacer and the two slabs.
Here are the elements in open position:

And in closed position.

For the beginners
With experience, you will know
where to place the pivot of the folding knife, according to the
mechanism used. So, you can start to use this gadget with a
completely finished blade.
In the other case, where it is necessary to grope a little,
here is a possibility:
- Trace the profile of the blade.
- In the approximate area of the pivot, cut out with the
cutter a rather broad zone (like 15x15mm). It is the area of
placement of the axis.
- Stick with transparent adhesive the shape of the blade on
a new transparent film.
You can thus "move" the hole of axis on the blade by repositioning the
profile of the blade around the hole thanks to the adhesive.
Once the position of the axis is determined, drill the blade and
finish it completely (heat treatments, grinding, polishing).
| | |