
Blacksmithing
and Cutlery
by Gérard HEUTTE


|
|
 Make a U-shaped forge

|
This article presents the realization of a do-it-yourself forge. Its shape out of U
makes it very practical to forge blades. The materials are
mainly of junk except a bit of refractory cement... The target
is to carry out an effective, portable and cheap construction.
The body is a part of a compressed air tank for truck. You can get one for free in the dustbins
of the garages for heavy lorries!
The tuyere is a simple drilled tube and placed at the bottom.
The inside of the hearth is made of refractory cement.
Principles
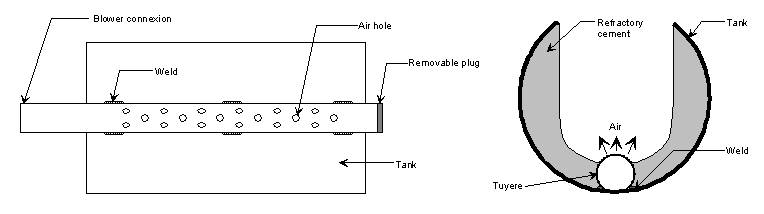
The two sketches below show the basic elements
for this realization.
On the left, a sight from top. To notice:
> The top of the tuyere is drilled with holes of 8 or 10, to diffuse
the air at the bottom of the hearth.
> The tuyere exceeds a little in front of the forge.
A removable plug will be placed here, which allows periodic
cleaning.
> The tuyere exceeds on the back of the forge (10cm).
You can connect here the tube coming from the blower.
The air circulation avoids an excessive heating.
> The tuyere is welded directly onto the bottom of the tank.
On the right, a cut showing:
> Diffusion of the air at the bottom of the hearth.
> The fitting conduit/refractory cement. The cement partially covers the
tuyere but leaves the holes apparent.
The approximative size of this forge is:
> Tank diameter 250mm
> Total lenght 480mm
> Fire earth useful lenght 370mm
> Fire earth width 160mm
> Fire earth height 170mm (from the top of the tuyere to the top of the forge)
> Front and rear bricks height 55mm (from the top of the tuyere to the top of the bricks)
Steps of the realization
 1 - Prepare the tank by cutting the
two ends and the top. For practical questions, it will be
necessary to weld a base for stability. Four blocked
squares are used to put feet when a support is not available.
Since the initial version, I have drilled each of these squares and
the feet to be able to link via a bolt.
1 - Prepare the tank by cutting the
two ends and the top. For practical questions, it will be
necessary to weld a base for stability. Four blocked
squares are used to put feet when a support is not available.
Since the initial version, I have drilled each of these squares and
the feet to be able to link via a bolt.
2 - The conduit is a metal tube (construction steel E24)
of 40mm diameter. Drill the tube with a series of holes
(diameter 8 or 10). Then weld this tuyere on the bottom
of the tank.
 3 - Then, the refractory cement should be put.
This operation is made in three steps. First
of all, the bottom then each side by laying down the bottle
on the side. The front and the back are "closed" by bricks.
3 - Then, the refractory cement should be put.
This operation is made in three steps. First
of all, the bottom then each side by laying down the bottle
on the side. The front and the back are "closed" by bricks.
On the photograph opposite, the coating with the
refractory cement on one of the sides. The
forge is lying on the side, the ends are temporarily blocked by
two refractory bricks. Then, the cement then is put in the
area thus delimited...

4 - Let dry a few weeks. For the
startup, make increasingly hot fires, to "cook" the refractory
cement. Opposite, the forge under operation (1) from face
(2) from profile below. To note, the telescopic system to support
the part during heating.
The forge is posed here on a junk frame.

Some tricks and ideas
To dimension the size of the hearth easily, the
simplest means is to place a brick or a brick back at the rear of the
hearth, directly posed on the conduit... Thus, the distance between the part and the
tuyere will be correct.
A support for rod can be carried out with two tubes
welded along the tank. These two tubes receive then a
sliding support, made out of concrete-reinforcing steel (folded and
welded).
Some improvements are possible. First of all, side handles to facilitate the displacement
of this forge.
You can also add a removable cap (in form of vault) out of
refractory material. This cap facilitates the rise in
temperature of the forge.
Among the limitations, the main one is impossibility of
using borax. Indeed, this one would fall at the bottom of the
forge and would end up destroying the tuyere. A side
tuyere would make it possible, but it is
another history...
| | |