
Blacksmithing
and Cutlery
by Gérard HEUTTE


|
|
 Electro-etching

|
Apart from the punch (marking mechanical, cold or hot), the signature of a blade can be
done by an electrochemical method. This is actually a form of local electrolysis... It's
clean and fast. The marking can be done once the blade almost complete.
Here are some guidelines for making a marking unit and its use. The necessary elements
are readily available in electronic stores. The cost is around 60 euros (mainly the transformer
and the box). Otherwise, with few concessions and recovery techniques, the price may be strongly
reduced...
Principle
Here is the principle

A stencil is placed on the blade to etch. This stencil contains porous area (the mark) and
sealed area (savings). The blade is connected to one terminal of an electric generator. The second
terminal is connected to a pad (sponge) soaked in electrolyte. The pad is applied to the stencil.
The electrical current then flows through the porous area of the stencil. With a DC voltage, the
metal of the blade is removed. The metal is gradually dug. With an AC voltage, the metal is
alternately removed and redeposited in oxidized form, blackening the surface of the mark.
Note: Even if the electrolyte is spread, only the metal below the porous area will be attacked.
Indeed, the current always chooses the easiest path (ie the least resistive and the shortest like
here)...
Stencil
There are several technologies to make stencils:
> One use stencils: Little appropriate because very fragile. They badly withstand deep etching...
> Polyester stencils: These stencils are films on which the logo part is porous.
They are usable with any kind of logo. They are tough and usable for many etching. They become dirty due to
etching residues. They must be cleaned softly with water.
> Plastic stencil: They are "true" stencils. They are very tough. They do not allow any kind of logo
due to the required cuts...
|
Plastic sencil
|

Polyester stencil
|
My stencils are carried out by
Framark company from a JPEG file.
The regular size for polyester stencils is 60x220mm, this enables 6 logos of reasonable size.
Schematic of an electroetching unit
A unit of electrochemical etching is finally a power supply that have AC or DC voltage.
here is a schematic:

> A switch lets you choose between AC and DC.
> The diode bridge can be made with four diodes like 1N4007.
> The capacitor C is used to smooth the rectified voltage. Its value is not very important.
Any electrochemical capacitor between 100 and 1000 μF (micro-farads)
can be used.
> The resistor R only serves to discharge the capacitor voltage during switching.
The value is not critical. 1KΩ can work.
Optionally, here is also a schematic for a light to be placed on the output and
after the fuse. It accepts DC and AC voltages between 6V and 20V. With this schematic
(voltage regulator), the LED illuminates steadily.

Part list:
Diode bridge (any)
R = 1500Ω
C1 = C2 = Electrolytic capacitor 100 or 220μF - 25V
IC1 = 7805 or 78L05 (5V positive voltage regulator)
Points A and B are connected to the output after the fuse. This LED is powered when the output
voltage is available. It will be off if the output fuse is cut.
Building an electroetching unit
Please note that the building of such equipment is not safe and requires skills in electricity
and / or electronic. If there is any, it is better to refrain!
The realization does not pose any major trouble. Simply attach the components in an appropriate
box and connect them according to the diagram. Electronic components are mounted on prototype PCB.
The bridge rectifier can be made with four robust diodes (Mini 3A).
Also plan two cables (one red and one black) in flexible wire, equipped with spring clips
(alligator clip) at one end to connect to the blade and the pad.

View of the interior and wiring.
|
|

View of the front face.
|
Electrolyte
The electrolyte can be purchased from specialized companies. More simply, salt water can be used
as electrolyte. A level spoonful of salt dissolved in 50 ml of water is a base that works well!
 Pad
Pad
There are many ways to make a pad. However, the simplest method is to lock the end of a
cotton swab within an alligator clip, ensuring a good electrical contact between the clamp
and cotton which will be regularly dipped into the electrolyte ...
When the swab is dirty (deposit of particles of metal removed by electrolysis), just change
it. For practical reasons, I cut the cotton swabs in half. It is easier to handle ... I usually
eat three or four cotton swabs for one mark etching.
 With use, the minus alligator clip is strongly affected by oxydation and corrosion.
This impedes electric contact. The most simple solution is to clean it with a file.
After many etching, it must be changed!
With use, the minus alligator clip is strongly affected by oxydation and corrosion.
This impedes electric contact. The most simple solution is to clean it with a file.
After many etching, it must be changed!
Method of use
Now that everything is ready, here's the procedure:
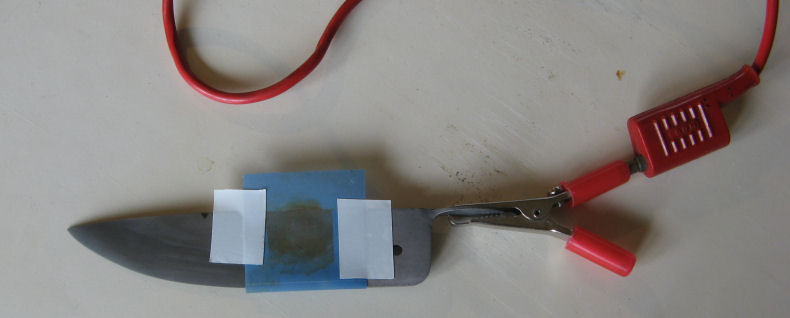
(1) Attach the stencil on the blade with electrician tape. It is not necessary to go around
the stencil, but the stencil must not move while etching (otherwise the mark will be blurred).
(2) Attach the clip of the "plus" wire on the blade (beware of scratches).
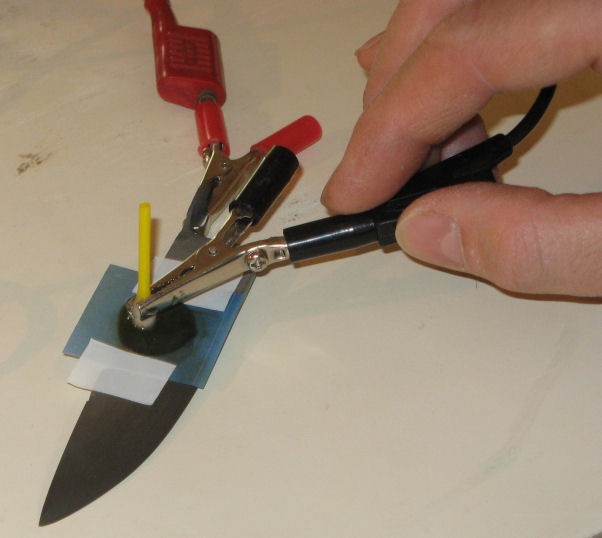
(3) Lock a cotton swab in the clamp. The metal portion of the clamp must be fixed on cotton,
to be in contact with the electrolyte.
(4) Set the unit to DC voltage.
(5) Dip the cotton swab end in the electrolyte.
(6) Apply the pad on the stencil by moving over the surface of the logo. It will ensure consistent
application across the entire surface of the brand. If the swab is too dirty, change it.
(7) Repeat steps (5) and (6) until the etch is deep enough. Usually I change the swab 4
or 5 times and this process takes 3-4 minutes.
(8) Switch the unit on AC voltage.
(9) Dip the cotton swab end in the electrolyte.
(10) Apply the pad on the stencil by moving over the surface of the logo. It will ensure consistent
application across the entire surface of the brand. If the swab is too dirty, change it.
(11) Repeat steps (9) and (10) until mark turns dark black. Usually I change the swab 2 or 3 times
and this takes about 2 minutes.
(12) Remove the stencil and clean the blade. The area around the brand is usually marked.
Fine sanding (400 grain +) usually solves the problem.
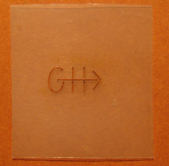
Results
Here is soft etching (small depth and without AC voltage). The mark is 4.5mm high. The blade
is matt (bath in ferric chloride solution).

|
|
Here is a more visible mark (normal depth and with AC voltage application). The mark is a bit less
than 3mm high. The blade is polished at 500 grit abrasive.

|
Experiments
To perform electroetching, several factors can be adjusted:
> Voltage: This unit delivers 6V, 9V or 12V.
> Composition of the electrolyte. On this topics, I lack of reference data. For the moment, I
use salt water. The concentration should influence the process. Other electrolytes may be used...
And without stencil?
The stencil is the ideal, but we can do without.
Solution 1: Nail polish
Cover the blade with a thin uniform layer of varnish. Draw what to etch with a needle by
scratching the finish. Then etch. Clean with solvent.
Solution 2: Beeswax
Put a small piece of beeswax on the blade. Slightly heat from below with a lighter.
Under the effect of heat the wax is spread out in a thin layer.
Let it cool. Draw what to etch with a needle or toothpick. If the design is missed,
warm up with the lighter to reform the layer of wax ... Then etch.
Warning, etch with low-voltage (preferably 6 or 9V) and small sessions due to the heat from etching
that could damage the drawing by melting the wax. Clean with hot water.
| | |