
Blacksmithing
and Cutlery
by Gérard HEUTTE


|
|
 Installation of a (competition) stack

|
This article presents the realization of a stack.
Indeed, find an anvil is not always easy. A stack is
usable for all work of cutlery. The assembly proposed here will
include some practical improvements.
 Stack
Stack
A stack is a block of steel with a plane surface and one
or more sharp edges. Ideally, the stack would be as heavy as possible.
Practically, do not go below 10kg. Any piece of steel can be used.
Opposite, a steel cylinder (100% junk) approximately 160
mm in diameter and 60 mm in height.
The surface of work was planed with an angle grinder and a grinder.
 Stand
Stand
To support the stack, a stand is needed.
Among the various possibilities:
> A piece of tree trunk.
> An assembly (joining, bolt, wood screw) of wood beams.
> A large piece of wood.
The important criteria are:
> Lower and higher faces must be plane and parallel.
> Correct height.
Opposite, a large piece of exotic wood (from junkyard) made up of
the assembly of three large beams (glued). It makes 200x200 and
800 mm in height. It was abundantly whitewashed of wood varsnish to
protect it.
Hot cutter
During forging work, it is
almost imperative to have a hot cutter for the anvil. With a stack, there is no
square hole to place one of them.
You must have another solution.
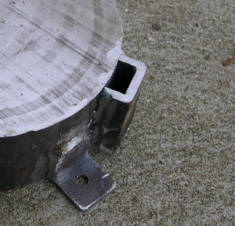
I have chosen to fix on the side of the stack a rectangular housing,
closed the the bottom and which makes possible to slip a vertical hot
cutter there.
This housing will be made with metal sheet of 5mm arc welded.
The whole will have to be strong because of the blows which
will be related to the cutter.
Parts of metal sheet.

|
|
Welded and trimmed housing.

|
|
The stack equipped with housing.
|
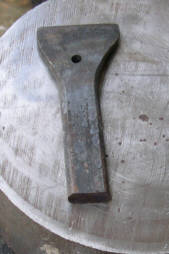
The hot cutter (C70 steel in 10x20) after forging.

|
|
The finished hot cutter.
|
|
The hot cutter in place.

|
Assembly
In general, an anvil of a certain weight
simply lay down on its stand. Its mass is sufficient to
ensure a good base. A light anvil will be fixed on the stand to
confer it stability and a certain "increase of the apparent mass".
For a stack, a fortiori a light one, a solid fixing will be necessary.
The mounting feet are cut in corner iron of 30.
They will be then arc welded onto the stack (four
positioned legs at 90°).
These legs will be drilled to fix the stack with wood screws on
the stand.
To limit the sound "of bells" of the stack, you can
intercalate between the stack and the stand a layer intended to
attenuate the vibrations (lead sheet, fitted carpet, flexible plastic,
rubber). For this precise subject, it is necessary to test...
In this example there, I directly fixed the stack on the block
(by tightening the wood screws well), and no vibration!
The cut corner iron.

|
|
Legs welded onto the stack.

|
Handles
 In my case, this stack is used as a "travel" anvil...
Two handles will help handling. I
laid out them so that they can also be used as a rack for hammers...
In my case, this stack is used as a "travel" anvil...
Two handles will help handling. I
laid out them so that they can also be used as a rack for hammers...
To carry them out: Tube of 25 diameter, flat sock of 25 and a bit
of arc welding. The photographs below speak by
themselves. Attention with the weldings of the tubes:
The tube used makes only 1.5 mm thickness. The arc welding can pass easily
through metal, even with rod of 1.6mm. Make fast and light cords.
The two vertical bars are drilled for fixing.
Opposite, the handles (posed the head in bottom on the ground)
ready for assembly.
 Support for tongs
If like me, you always have tongs lying around everywhere,
one or two supports will enable you to put them along
the stand...
An corner metal of 30, round of 8 or 10, two holes, a point of
arc welding, two wood screws and here is a support. The
tong is always within reach, does not fall and does not lie around.
 Result
And here, after a few working hours, you have
something "to strike metal" under good conditions.
Opposite, the stack finished and equipped, on its stand.
| | |