
Blacksmithing
and Cutlery
by Gérard HEUTTE


|
|
 Making of a knife with hidden tang

|
Here is, step by step, the assembly process for a knife with hidden tang.
There are probably some other ways of making. This
method does not require too much specialized tools.
The sketches show the parts of profile, with possibly the
corresponding sections (hachured).
I will place photographs as soon as possible...
Basic recall and vocabulary
Here is what a knife with hidden tang looks like:
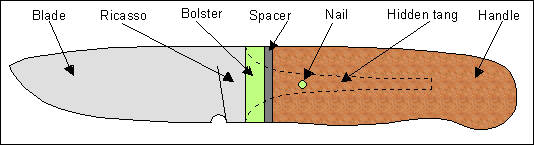
The tang goes through the handle, dug beforehand. The assembly
is made by gluing and/or a nail which crosses the handle and the tang.
You can replace the bolster by a guard if you wish to protect
the fingers from the edge, if ever the knife suddenly slip into
the hand.
Blade
It is necessary to make or get an adequate blade, like this one:

How to forge a
blade with hidden tang.
Bolster and spacer
Start from a brass or better nickel silver flat part:
- Width: Thickness of the knife + margin.
- Length: Height of the knife (or the guard) + margin.
- Thickness: A few millimetres at least.
Measure the section of tang behind the ricasso and at a
distance corresponding to the thickness of the bolster. Transfer
the form on the flat part. Make the rectangular hole (some
holes inside the shape then work with the file.
Bevel the small side to be enable the bolster to come
in contact with the ricasso. Work very
gradually to avoid a gap at the junction
ricasso/bolster.
For the spacer, you can choose a reconstituted wood coloured
(see at Mercorne
) or leather.
Cut out with a cutter a rectangular hole to be able to
pile up the spacer on the bolster.
 From the left to the right: From the left to the right:
- Holes in the flat part.
- Bolster with rectangular hole.
- Bolster seen of profile. The hole was bevelled to adapt
to the tang.
- Spacer seen of profile.
Handle
 1 - First of all, it is necessary to drill
the piece of wood in the axis. For that, you can drill a hole
as a guidance at each end. The hole of bottom will be inserted in an
ankle itself placed in a wooden support, in the axis of the drill.
Drill through the second hole until the desired length.
1 - First of all, it is necessary to drill
the piece of wood in the axis. For that, you can drill a hole
as a guidance at each end. The hole of bottom will be inserted in an
ankle itself placed in a wooden support, in the axis of the drill.
Drill through the second hole until the desired length.
 2 - The entry should now be widened. For that drill two
slanting small holes, then enlarge them. The excess
matter can be removed with a wood chisel and/or a rasp.
2 - The entry should now be widened. For that drill two
slanting small holes, then enlarge them. The excess
matter can be removed with a wood chisel and/or a rasp.
Work by successive improvements while trying to
enter the tang in the handle.
For this work of fitting, it could be useful to modify a round
rasp with the angle grinder to give it a square section with teeth on
only one face. Be careful to not soften it.
Assembly and shaping
1 - First, the parts should be
prepared. Surfaces which will be glued must be striped with a
coarse grit sandpaper. They must then be degreased (with
acetone for example). They must not be touched any
more.
2 - Prepare the glue. I use araldite with
two components. Avoid the glues with rapid hardening.
They do not allow any error and further it is necessary to make
quickly! You can add sawdust there coming from
material of the handle. This sawdust colors the glue and
makes possible to absorb dilations at the time of polymerization.
3 - Fix the blade in a vice with the tang upwards.
Coat the tang of glue.
4 - Whitewash of glue the hole in the bolster and
insert it on the tang (in the rigth way). Coat the visible part of the bolster with
glue. Thread the spacer on the tang and apply it on the
bolster. Coat the visible part of the spacer with glue.
Using a stem, fill the hole of the handle of glue.
Insert the handle on the tang.
Here is this stacking:

Do not worry about the glue overflow around the bolster, the spacer and the
handle... To remove the whole from the vice. Fix the
whole by the handle in the vice.
5 - The whole should be now tightened. For that
you can use a screw clamp on the blade, by protecting it by two clamps.
Use two other large screw clamps to compress the whole, by leaning
on the first clamp and the end of the handle!
The glue must "flowe" generously. Remove with a
solvent (in general alcohol) the surplus of glue around the
Bolster/Ricasso junction.
Let dry.
6 - It is now necessary to give a shape to the handle.
You can "squared initially". Regularize the
thickness of the handle, while taking care of his alignment with the
blade. Then, give to the handle the desired profile.

7 - Eliminate the surplus of matter beyond
the blue line of the final profile.
In the second time, one will break the angles to round the
shape.
All these operations will be done with an abrasive. The
ideal is the backstand. If as me you do not have one, it is
possible to use a drilling machine with abrasive discs (coarse grain).
For the completion, abrasive paper bands of increasing
fine grit give good results.
In option: The crossing nail
If you wish to reinforce the assembly, it is
possible to put a crossing nail.
The simplest method consists in making the assembly until you get
the handle squared. Then, fix the blade at horizontal and drill
the tang and the handle. To know where to drill, it is
necessary to envisage a template out of paperboard of the blade and the tang,
with the location of the hole, defered on the handle.
Prepare a nail (stem of brass or copper nickel from 2 to 4 mm
diameter) by striating it with the file to
facilitate the fixing of the glue. One of the ends will be
made slightly conical to facilitate the insertion. Insert
the nail whitewashed beforehand with glue.
| | |