
Blacksmithing
and Cutlery
by Gérard HEUTTE


|
|
 Making of a full tang knife

|
Here is step by step, the process of assembly of a full tang knife.
There are probably many other possible ways. This method does not require
too much particular equipment, even if a drill press is desirable.
Reminder and basic vocabulary
Here is which looks like a full tang knife :
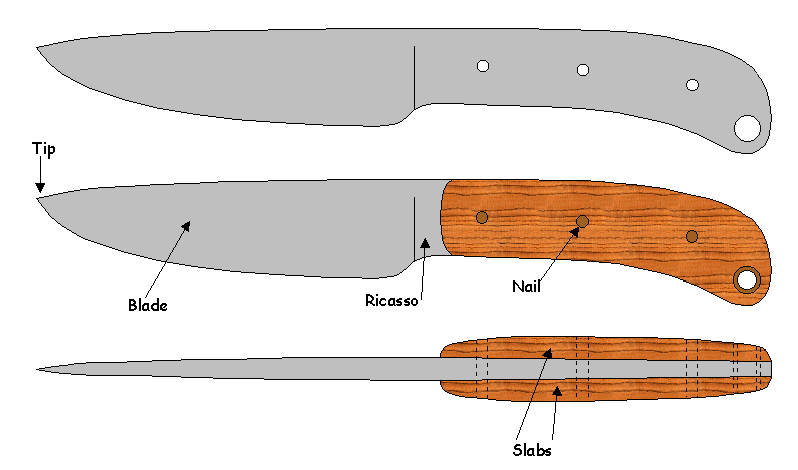
The metal part of the tang and the slabs have exactly the same profile. The tang is taken in
sandwich between each slab. The set is glued and/or riveted.
The simplest method consists in taking wooden only slabs. For a more sophisticated aspect,
it is possible to add metal bolsters (at the ricasso or at the pommel). I will not detail
here the assembly of the bolsters which is similar to the assembly of the wooden slabs.
Blade
It is necessary to make or have a blade like this one :

The main point during the manufacturing is the flatness of the tang. On this model, the small
holes are for nails and are drilled at 1.8 millimeters of diameter. The big holes are intended
to lighten the tang. The hole at the end of handle is for a wrist-strap.
Slabs
It is necessary to get wooden slabs. The usual thickness goes from 3 to 8 mm according
to the size and the style of the knife. Here also, the flatness and the parallelism of the
sides are fundamental for an assembly of quality.
Ready to use slabs can be bought from specialized suppliers like
Mercorne
.
Plan a light sanding before use.
If needed, cut a wooden block or a branch of tree in unrefined plaques with a saw. Smooth
roughly surfaces and check the parallelism.

The wooden plank (hawthern) for the future slabs.

Cutting the slabs.

The slabs after sanding.
Copy with a pencil the shape of the tang on each slab and cut them with a margin of 1 or
2 mm. From now, the orientation of each slab must be marked (left or right side and external
or internal direction). Keep the most attractive side of the wood for the outside.
The cutting can be made with a hand-saw or with a cut out saw...

The shape of the tang is copied on the slabs.

Cutting of the slabs, here with a cut out saw.

The slabs after cutting.
Drilling
To drill correctly, realize the following stack:
> At the bottom, a scrap plywood plank. This part avoids the bursting of the wood when the
bit exits.
> Both slabs.
> The blade.
Align the stack and hold it by clamps. Drill the wood using the holes of the tang as a
guide. It is strongly advised to use a drill press.
To help the positioning and the handling of this set, it can be fixed to a big square or
a metal "U".
If holes are too close or the clamps too wide, it will be necessary to drill a hole, then
to insert a temporary nail to keep the position and to move clamps to drill the other
holes.
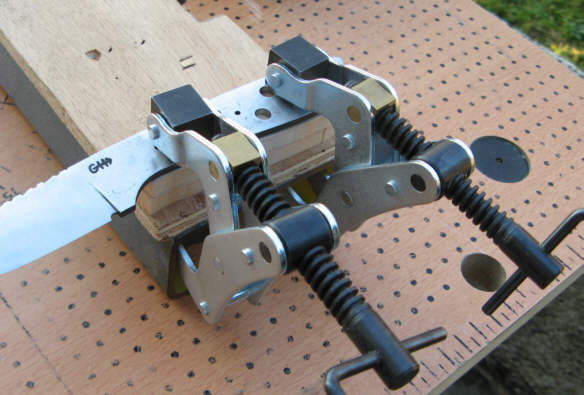
The stack and the clamps.
After drilling, the inside of the slabs can be scratched with a rasp the increase glueing
quality.

Check of the assembly.
Ricasso
After the final assembly of the knife, the edge of the slabs close to the ricasso will be
inaccessible! It is thus necessary to make the finish before the assembly.
For that purpose, insert temporary nails into the holes of slabs to align them correctly
and hold them by clamps. Do not forget to insert small wooden part to avoid marking the
surface of the slabs with the bits of the clamps.
Rectify and align edges at the level of the ricasso, and here at the level of the heel
of the knife (near the hole for the wrist-strap). This method allows a good finish and
a good alignment of the slabs on each side of the knife.

Sanding of the edge close to the ricasso.
Round off angles, which will not be accessible any more easily after the assembly of the
knife. Use strips of abrasives by fixing the slab to be worked. Sand until 400 grit.
Outlines and final shaping
It is now necessary to work the outline. Fix again the slabs with the temporary nails and
adjust the outline to the tang.

The curve of the handle near the ricasso and the slabs adjusted to the tang.
Break the angles (rasp or sander). This operation can be made with the slabs on the tang or
with the slabs removed. It is especially a rather personal question.
Round off the handle strips of abrasive. As slabs are not fixed, it will be necessary to work
on several times, by fixing temporarily the slabs with 2 nail at once. Sand until grit 400.

Slab with broken angles.

Shaping with a strip of abrasive.

The finished slabs.
Rivets
The term rivet is not the most appropriate because the head does not exist. It would rather
be necessary to speak about rods or nails.
The choice of the diameter (generally 1.5 in 3mm) is above all a question of aesthetics.
The material is not critical: copper, brass, steel, nickel silver...
Cut so many parts as needed and add a margin of 2 cm.
Make an end conical to make positioning easier.
Assembly
The assembly is made in one step. Prepare a plier to manipulate the nails.
Prepare also a solvent for the glue (90 ° alcohol for epoxy) and cotton-buds to clean
the smudges of glue.

The differents parts: Blade, slabs and nails.
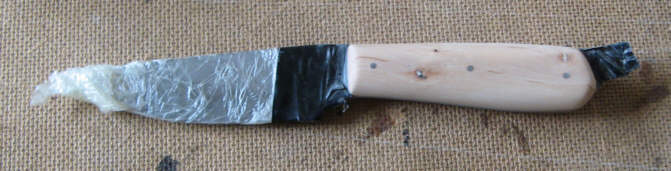
At this level of progress, the blade must be totally finished. Here, it was sanded and the
case hardening has been revealed. Protect the blade with a plastic film.
> Prepare the epoxy glue.
> Coat a slab and the nails with glue.
> Engage the nails in the slab, by letting them exceed by some millimeters.
> Position the slab against the tang, by engaging nails in their hole.
> Coat with glue the second slab (or the tang).
> Position the second slab and insert the nails.
> Sighten the set with clamps by watching to not damage the slabs. Push nails until they
go out enough.
> Remove boorishly the excess of glue.
> Clean carefully the junction of the slabs with the ricasso with a cotton-bud and solvent.
> Let dry.

The parts coated with glue.

Ther assembled knife.

The locations difficult to reach (here, the junction ricasso / slab) must be
cleared from excess of glue.
Finishes
Remainng tasks are:
> Cut exceeding lenght of nails.
> Protect the blade with some adhesive. Nothing is more irritating than an unfortunate scratch
on an almost finished knife!
> Sand slowly the excess of nails and glue.
> Treat the wood of handle in linseed oil.
The handle after final sanding.

The finished knife.

Some details.
 Optional: Bolsters
Bolsters will be assembled in the same way as slabs. For aesthetic reasons, the nails to fix
the bolsters should be in the same material as the bolsters.
Then for the fixation of the slabs, the process is the same as above, but the slabs should be
tighten against the bolsters to avoid the unsightly gaps.
Opposite, bolsters in brass. The two nails for the fixation of the bolsters are invisible.
Slabs and bolsters are separated by a colored spacer.
| | |