Blacksmithing
and Cutlery
by Gérard HEUTTE


|
|
 Blacksmithing exercices

|
This page proposes blacksmithing exercises.
The objective is the learning of the elementary operations which
will allow by combining them to make a good blade.
Ideally, it is desirable to learn under the supervision of a
blacksmith. These indications will not replace a teacher,
when you have the chance to get one!
Of course, it is necessary to have a minimum of tools:
Forge and fuel, anvil or stack, hammer, tongs...
 Principle of creep
This is THE principle you must understand to be able to forge!
When you hit on the steel,
it loses thickness and the matter is pushed on the sides.
This effect is stronger when the surface of impact is curve
rather than flat. According to the shape of the hammer which
strikes, the matter can move according to a privileged axis:

With a circular impact, the matter is driven out
in a homogeneous way.
|
|

With a rectangular impact, the matter is more
strongly driven out along large sidess.
|
 The thickness reduction also creates an alongement in the
axis of the most important deformation. The figure opposite
shows the part from profile before and after impact.
The reference marks (X) show well the increase length of the part.
 Planing
 When the hammer struck several times a part, the
surface quality of this one is presented in the form of a
juxtaposition of more or less regular hollows... It is then
necessary to plane the part to give it a good surface quality.
For that two methods:
- Set hammer. It
is a tool with a flat face which comes on the part. The part
is planed by striking on the top with the hammer. Move the set
hammer on all surface to work. The problem is that it is
necessary to be two to use a set hammer. Indeed, it is
necessary to hold the part, the set hammer and to strike with the hammer...
- Hammer.
A delicate and regular striking with the hammer makes
possible to arrive at the same result! It is just a little more
difficult and a little longer. It is the best way of making
when you work alone.
 Stretching
 The stretching is a fundamental operation for blacksmithing.
It consists in lengthening a part while decreasing its
section. You can practise in two different ways:
- On the anvil horn :
In this case, the creep is done by the lower part. It is the
convex part of horn which allows the crushing and the lengthening of the
metal. The figure on the left indicates the position of the bar
and the cross the zone of impact for the hammer.
- Hammer : You must use a convex hammer or one with a
narrow transversal peen (and of course convex).
The work is made on the table of the anvil
and the creep is done by the top.
In general, it is necessary to plane surfaces after the
stretching.
Very often, the blacksmith will combine these two
possibilities. He will work on the round horn and will
use a strongly convex hammer!
For stretchings on big lengths, it will be better to often
correct the resulting shape, by planing and rectifying it.
 Flat part
 During this exercise, one will create a flat part
starting from a round. This simple exercise takes all its
interest if precise dimensions are wished. For example, to go
from a round of 10 to a flat part of 3x12.
Crush strongly the bar to start to form the
rectangular section. Then, work on the edge to
complete the section. Then, work on all the faces for a
better regularity. Stretch to adjust dimensions. Rectify
the flat part regularly.
To supplement this exercise, it will be necessary to be
involved with:
- To decrease the width of a flat part by preserving the
thickness.
- To decrease the thickness while preserving the width.
 Modification of section
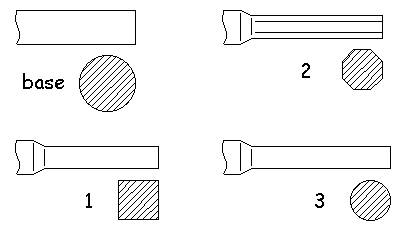
 During this exercise, you will modify a metal rod
to get a square, octagonal then round again.
Start this exercise over a small length
(10cm) before testing on bigger lengths.
(1) Square : Work on
the flat part of the anvil. It is necessary to crush the round
according to two orthogonal axes. If you hold the round with a
tong, you will work in general on two faces. If you hold the
round with the hand, it will be easier to work on the four faces.
In all the cases, it is necessary to work alternatively on the
two orthogonal axes.
Possible troubles:
- Angles rounded or bad surface quality. Several causes
are possible. Most probable is a bad "blow of hammer".
The peen is poorly controlled and does not strike all the time
the metal with the right orientation. Also take care of resting
the part on the flat of the anvil.
 - Rhombus. The angle between the two axes does not make
90 degrees. It is the most difficult trouble to correct!
It is necessary to position the bar cantilever on the anvil and
to hit on the top to exert a kind of shearing (see sketch opposite).
It is often necessary to remake a finishing work after this kind
of correction.
- Rectangular section. An axis was worked more than the
other. One can rectify easily by crushing the greatest width.
- Spin. This defect often occurs over the big lengths.
It translates a light defect of support of the part. You
can rectify the work progressively.
(2) Octagonal : The transformation of
the square in an octagon is done by "breaking" the four angles of
the square section. For that, place the square on the
anvil posed on an angle. Hit delicately on the
angle of the top. Break thus successively all the
angles. The difficulty is to proportion the octagon.
(3) Round : A return to a
round section is done by breaking all the angles of the octagonal
section... It will be necessary to avoid creating
surfaces. For that, one will make turn the bar on his axis at
the time of strike.
 Curve a flat part
 This exercise of preparation for the forge
of the blades is extremely simple. It is necessary to start
from a flat part and to give it a curve, without spin it and by
preserving the thickness. The sketch opposite is explicit.
Work alternatively:
- On the anvil horn and the flat part of the side for the curve.
- On the flat part of the anvil to rectify the thickness.
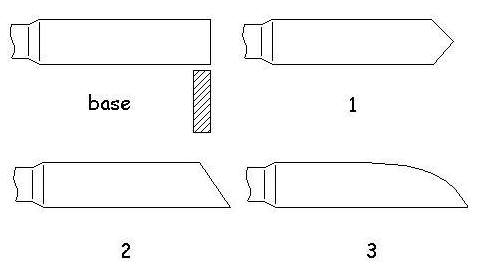
 Point
Point
 This exercise consists in making a point at the
end of a square. Start by creating a "pyramid" at the
end of the square. Then make "go up" the edge to
refine the point. You can continue until this edge disappears.
 bevelled point
 This exercise consists in forging a point in
bevel at the end of a flat part. Start by breaking the two angles. For that,
strike at the end at 45°. The thickness is often rectified.
This method avoids the formation of a lip or a fold which would
weaken the point. Folds back the angle thus formed.
Then Round the bevel if necessary...
 Simple leading edge
It is a question of carrying out a fast change
of section. The thickness of the flat part is kept but its
width decreases abruptly starting from a mark. It is the kind
of work used for the stem of blocking for Piedmontese or to forge a
spiral at the end of a handle in full-tang.

Initially, mark the leading edge in "A". For that,
you can use:
- Round anvil horn. It is suitable if you wish a soft or round
transition between the two sections. Attention,
the smallest "radius" of anvil horn is not so small!
Pose the edge of the flat on the horn and strike strongly by
the top to make a hollow.
- Edge of the anvil. One will place the flat part at
45°...
- Fuller. It is a specialized tool which fits in the
square hole of the anvil. It is the same principle that with
horn, but the ray is much weaker!
The excess part (on the right of "A" on the sketch) will be
then stretched. The final shape in "B" will depend on what was
used to mark the setback...
 leading edge
It is the operation which makes it possible to create a tang.
It is very close to the technique explained above.
Two marks should be made, while taking care of their alignment.
In the same way, the excess part will be stretched. In
the case of a tang, take care to create conicity in width and thickness.

 And now, with these exercises, we have seen the bases necessary to forge blades.
| | |


