
Blacksmithing
and Cutlery
by Gérard HEUTTE


|
|
 Case hardening

|
Here are the operations to follow to make case hardening with clay.
I present my/a method and
not the method. There are undoubtedly
other ways of making.
I will approach here only oil or goop hardening.
They are less difficult than those made in water.
Moreover, the risks of breakage or crack
are less. The kind of steel targeted by this technique is
not or slightly allied.
For the pictures, a large thank you to the reporter: My son Nicolas.
Utility
Case hardening is an interesting technique.
It makes possible to give a blade qualities:
- Mechanics. The edge, hardened, gives a good cut.
The back of the blade, not hardened remains soft.
- Esthetics. The revelation shows the quenching line
(limit between the hardened area and the not hardened area).
Principle
The blade is partially covered with a coating
based on clay. This envelope is heated at the same time as the
blade. During hardening, the coating restores the heat
accumulated during heating. The speed of cooling of
steel in the vicinity of the gangue is strongly reduced and hardening does not
work! The naked left part is hardened.
Preparation of the blade
 After forging and annealing, make
a coarse grinding. Do not go on a too advanced level
of completion! The irregularities of surface help the coating
to hold. If needed, finish with abrasive paper with average grain
(like 120 or 180 grit).
After forging and annealing, make
a coarse grinding. Do not go on a too advanced level
of completion! The irregularities of surface help the coating
to hold. If needed, finish with abrasive paper with average grain
(like 120 or 180 grit).
 Clean the blade with washing-up product. Rinse it
well. Then under a thread of water or in a small can,
vigorously rub it with a piece of charcoal, before rinsing it
carefully. Do not wipe it, drain it is enough.
Clean the blade with washing-up product. Rinse it
well. Then under a thread of water or in a small can,
vigorously rub it with a piece of charcoal, before rinsing it
carefully. Do not wipe it, drain it is enough.
From this step, the blade should not be touched any more!
Coating
We speak a little wrongly about case hardening with
clay, since actually, clay is only one of the components of the used
coating.
This coating will be made up as follows:
- Clay (1 volume)
- Charcoal (1 volume)
- Silica or noncalcareous sand (1 volume)
Clay (quite dry) and the charcoal will have to be
crushed finely using a mortar and a rammer. They will be
then filtered very fine.
Sand (or silica) will be also filtered.

These components can be prepared in advance then stored in
hermetic boxes.
|
|

The coating will be prepared on a plate out of glass or a
sheet by depositing the well proportioned ingredients there.
|

Mix with a spatula until homogeneity.
|
|

Then, humidify with a little water and mix.
The required consistence will be that of the fresh cream.
|
The proportions given above are the base. They will be
able to vary according to materials themselves and their properties.
If the coating fissures or bursts during hardening, it is
generally necessary to decrease the clay amount.
According to the receipts, we can note sometimes the presence
of iron filings.
Apply coating
 The installation of the coating will be done
thanks to a spatula. You can use a palette knife
(artist not building) or any other object since it is fine and
flexible. Pose the coating on the sides of the
blade, by small successive touches on the basis of the future quenching
line then go up towards the back of the blade.
Try to have an quite constant thickness.
The installation of the coating will be done
thanks to a spatula. You can use a palette knife
(artist not building) or any other object since it is fine and
flexible. Pose the coating on the sides of the
blade, by small successive touches on the basis of the future quenching
line then go up towards the back of the blade.
Try to have an quite constant thickness.
If the coating is difficult to deposit and format, it is
probably too dry. If it subsides, it is too liquid.
Turn over the blade to work the second side. If
the coating falls or runs, it was too liquid. Proceed
in the same way for the other side of the blade.
To finish, add coating on the back of the blade to
join and seal the two sides. The thickness of coating must be approximately 3 to 4
mm. In doubt, better is worth to envisage a little too much.
The surplus could be removed later.
If you overflow a bit on the level of the quenching line
you can try to rectify at this step or more easily when
the coating is dry.
Attention, the discovered area (i.e. that which will be hardened)
should not go up too high. A third of the blade is a maximum.
In the contrary case, the blade could break under the
internal stresses due to hardening.
Drying of the coating
 The drying of the coating can be done directly
with the forge. It is faster than to await natural
drying.
The drying of the coating can be done directly
with the forge. It is faster than to await natural
drying.
For that, use a fire not too strong.
Gently move the blade above the hearth.
Do not precipitate the things because the coating could
split. At the beginning, nothing special occurs, then
you will see steam being released from the coating.
 Gradually dry zones will appear.
 Continue a soft heating until complete drying.
Prolong a few minutes to dry in-depth. This complete operation
takes approximately 15 minutes.
Continue a soft heating until complete drying.
Prolong a few minutes to dry in-depth. This complete operation
takes approximately 15 minutes.
Smoothing the coating
 To avoid possible deformations of the blade during
hardening, it is desirable to regularize the gangue of coating.
An old file will be used. Smooth the two faces,
while taking care to preserve the same thickness of coating on each
sides of the blade. The back will be also
regularized.
To avoid possible deformations of the blade during
hardening, it is desirable to regularize the gangue of coating.
An old file will be used. Smooth the two faces,
while taking care to preserve the same thickness of coating on each
sides of the blade. The back will be also
regularized.
This operation is delicate. It is necessary to make if soft
while avoiding hard pressure on the file!
It is necessary to leave a thickness of approximately 3
millimetres. If there are holes or lacks, you can try to fill
then dry. But it is far from ideal!
Better is to have a little
margin since the beginning.
 At this step, you can rectify the profile of the edge by
scraping with a small wood stylet or a screwdriver delicately handled
the surpluses of coating.
At this step, you can rectify the profile of the edge by
scraping with a small wood stylet or a screwdriver delicately handled
the surpluses of coating.
Cooking the coating
 Like a pottery, this coating must be cooked.
In an average fire, Heat the blade by posing it on the
back, hidden well in the charcoal. The edge can exceed a little
on the top. Attention to the tip of the blade which
should not be overheated.
Like a pottery, this coating must be cooked.
In an average fire, Heat the blade by posing it on the
back, hidden well in the charcoal. The edge can exceed a little
on the top. Attention to the tip of the blade which
should not be overheated.
When the coating is red (at least on the back of the blade),
one will be able to turn the blade for cooking the two
sides alternatively. Do not remove the blade from the fire
and pass directly to...
Hardening the blade
 As soon as the coating is cooked, place the
blade edge downwards. Heat gently until the temperature
of hardening. Longitudinally move the blade to have a
homogeneous temperature. Attention there to not overheat
the tip. When the good temperature is reached, cut the
ventilation of the forge, leave a bit the blade in embers
and move a little to homogenize the temperature.
As soon as the coating is cooked, place the
blade edge downwards. Heat gently until the temperature
of hardening. Longitudinally move the blade to have a
homogeneous temperature. Attention there to not overheat
the tip. When the good temperature is reached, cut the
ventilation of the forge, leave a bit the blade in embers
and move a little to homogenize the temperature.
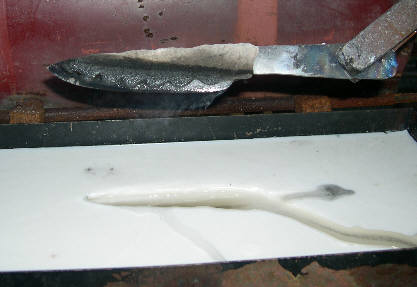
Remove the blade and to quench it quickly in oil (warm) or in
goop. See opposite.
Ideally, the coating remains in place. If it bursts, it
is not synonymous with failure. It will be necessary however to
check carefully with a fast polishing and a revelation (without
forgetting to test the edge with a file).
Completions

Remove the clay gangue. Clean the
blade. Then, make the tempering.
|
|

Polishing will be made in a usual way
(backstand or elbow grease). At this step, nothing special to see!
|
Revelation
Finally, reveal the quenching line
by repeating 3 or 4 times (until correct visual aspect)
the following operations:
- Immersion one minute in iron perchloride.
- Fast rinsing with water.
- Cleaning of the residues of oxidation with steel wool (or
with a very fine abrasive, 1000 grit or more).
The perchloride is bought in the stores of electronics (for the
do-it-yourself). It is normally used for the engraving of
the printed circuit boards.
And imperatively to
finish: Conscientiously clean the blade with steel wool and washing-up
liquid! This product, strongly basic, neutralizes the
residual attack of metal by the perchlo.
And here is:
The blade before its assembly.

And
finished
knife.
Modification of the blade geometry
Without going in the details, the hardened
steel is bulkier than not-hardened steel (They do not have the same
crystalline structure). Case hardening thus tends
naturally to modify the shape of the blades. With the dilating of the edge,
the blade tends to curve itself (i.e. the tip "goes up").
For this reason the katanas and tantos are forged straight and
finish curved!
NB : This deformation is more marked if the ratio (hardened/not hardened part) is
important. If the edge is discovered too much, the blade can
break! Thus avoid discovering more than one third height of the blade.
Clay on the edge
 One of the possibilities for case
hardening is to cover the totality of the edge of a fine layer of clay.
A thick layer of clay stores heat and prevents hardening.
A fine layer of clay (from 1 to 2 tenth of millimetre) improves
hardening by accelerating the transfer of heat. Indeed, a fine
layer limits the formation of vapor film due to the
immersion of the blade in the quenching bath. It practically
does not store heat. For practical, make an almost
liquid mixture, soak the blade in this mixture then to shake it
slightly. You can also apply this fine layer with a brush.
One of the possibilities for case
hardening is to cover the totality of the edge of a fine layer of clay.
A thick layer of clay stores heat and prevents hardening.
A fine layer of clay (from 1 to 2 tenth of millimetre) improves
hardening by accelerating the transfer of heat. Indeed, a fine
layer limits the formation of vapor film due to the
immersion of the blade in the quenching bath. It practically
does not store heat. For practical, make an almost
liquid mixture, soak the blade in this mixture then to shake it
slightly. You can also apply this fine layer with a brush.
The curve opposite is a synthesis of the data relating to the
water quenching of the Japanese blades. It shows the influence of the layer
thickness on the cooling time of a heated steel at 800°C until 100°C.
It is seen that a fine layer
of clay decreases this time of a little more than 2 seconds to less
than one second!
| | |