
Blacksmithing
and Cutlery
by Gérard HEUTTE


|
|
 Assembly of a Piedmontese folding knife

|
Here is step by step the making process of a
Piedmontese knife.
After the
blade,
the large part of work consists in the realization of the
handle and fitting.
The base
 Here is the blade of the knife. It is forged
in XC70.
Here is the blade of the knife. It is forged
in XC70.
It is necessary to take care to have a good geometry of
blade. To know:
- At the level of the hole of the pivot, you will need quite
parallel faces.
- The axis hole must be drilled lower (i.e. towards the
edge) that the median of the blade.
- The blade thickness must be slightly lower than around
the pivot to avoid the rubbing in the slit of the handle. In
the contrary case, envisage two fine washers (1 to 2 tenth of mm), to take
in account for the stacking of thicknesses.
 On the rear of the pivot, a pallet is produced. It
will press on the handle in open position and will be maintained
by the thumb. It will thus be necessary to envisage a cutting on
the top of the handle to receive it. In closed position, it
will help to come out the blade from the handle. So it is useless
to envisage a notch for the nail or a hole in the handle to seize
the blade.
On the rear of the pivot, a pallet is produced. It
will press on the handle in open position and will be maintained
by the thumb. It will thus be necessary to envisage a cutting on
the top of the handle to receive it. In closed position, it
will help to come out the blade from the handle. So it is useless
to envisage a notch for the nail or a hole in the handle to seize
the blade.
 The pivot of this folding knife will be made with a bookbinding screw(see opposite).
It is necessary to have wood slabs. Here, I use some Holly wood, but any hard
wood will work. Check before you can work it correctly by making some drillings,
joinings and cuts on a fall.
Modeling
In a first time, the knife should be designed.
Use for that a small plank. In a corner, drill a hole of the same diameter as the pivot.
The blade will be placed here. In opened position, draw the back of the handle.
In closed position, defer the profile of the blade. Take care to leave enough
space between the back of the handle and the edge (in closed
position) so that the spacer is not ridiculously narrow. In
order to have a good surface of joining and as I use pins of 2mm, the
spacer must be at least 5mm broad where there are the pins.
Draw the external shape of the handle.

Test in open position.
|
|

Test in closed position.
|
With the model, you have templates for the two side slabs and the spacer.

Cut out parts
Cut out the three necessary parts in small boards of low thickness
(5 to 8 mm). The shapes of the
templates will be deferred by taking care to keep a small margin (2 or
3 mm). You can use a band saw. With defect,
one will use a saw and drillings for a coarse cutting. Below
coarse cutting with the saw and by drilling:

The profiles of these parts will be worked out roughly with the rasp
then finished with abrasive paper. If needed, surfaces will be
rectified by sandpapering them on an abrasive paper sheet fixed on a
thick glass plate.
 You need also to rectify the external side of one slabs.
This face will be used as references to drill the axis hole
and the holes for the pins.
You need also to rectify the external side of one slabs.
This face will be used as references to drill the axis hole
and the holes for the pins.
At this step, it will be necessary to think of
recovering fine wood dust (to include it later in the glue).
It is now necessary to rectify the thickness of
the spacer. Measure with the slide caliper the
thickness of the blade around the pivot. Reduce the thickness
of the spacer to this dimension.
Just as for the slabs, you can start with the
rasp then to finish with abrasive paper. It will be necessary
to take care to finish with quite plane and parallel surfaces.
Place the spacer between the slabs to check
by inserting the blade at the location of the axis.
It must pass easily but not present excessive play.
Drilling the axis hole
 On the slab with the two sandpapered
faces, trace the position of the axis hole. Fix the two slabs together
(screw clamp, adhesive).
Pose the unit on the reference side and drill the axis hole.
With this method, it is quite orthogonal to the sides and
will be correctly aligned for the two slabs.
On the slab with the two sandpapered
faces, trace the position of the axis hole. Fix the two slabs together
(screw clamp, adhesive).
Pose the unit on the reference side and drill the axis hole.
With this method, it is quite orthogonal to the sides and
will be correctly aligned for the two slabs.
Gluing the spacer
 To glue the spacer, the work should be prepared:
- Trace on the slab the position of the spacer with the lead
pencil.
- Coat the blade with a fine film (film for microwaves) in
order to protect it from the glue.
- Prepare an axis for the pivot.
Get the following equipment:
- Bi-components Araldite glue (with long drying time).
- Plate and spatula to prepare the glue.
- Fine wood dust.
- Spring grips.
Then carry out the operation as follows:
- Prepare the glue by following the instructions of
the supplier.
- Include a bit of fine wood dust.
- Coat the slab with glue on the surface
corresponding to the layout of the spacer (see below).
It is seless to put a too thick glue layer.
- Put the spacer in the right position.
- Press gently while taking care not to make the spacer slip laterally.
- Place a grip at each end.
- Remove the excesss of glue.
- Insert the blade on the temporary axis.
- Bring it in closed position to check the positioning of the
spacer. Adjust its position if necessary.
- Place the other grips to ensure tightening. They
should be positioned well in the center. A pressure on the edge
of the spacer could distort the parallelism.
- Withdraw the blade and remove the protection.
- Dissolve the excess of glue with alcohol.
- Let dry for the required time.

The gluing of the slab.
|
|

Grips for drying.
|
Positioning the pins
Crossing pins come to reinforce the assembly.
Drilling at this time allows to position
them correctly in regards of the spacer.
You can use brasswire of diameter
2 to carry them out.
Trace a line parallel to the interior edge of the guide.
For pins of 2, trace this line at 3mm from the edge.
Place 4 or 5 regularly spaced pins.
Drilling will be done with a lower diameter (e.g. 1 mm)
Hollow for pallet
It is now necessary to outline the hollow that will receive
the pallet. Assemble with a temporary axis. Trace the approximate outline
of the pallet. Cutting will be
made with a sharp knife or a chisel and will be finished by
sandpapering. Start working on the slab with the spacer,
then the other.
Gluing of the second slab
To glue the second slab:
- Assemble it with a temporary axis on the first plate.
- Prepare some glue like above.
- Coat the free face of the spacer with the glue.
- Insert the second plate on the axis.
- Press the plate against the spacer while taking care of
its alignment with the first slab.
- Place the grips to ensure tightening.
- Clean the bottom of the slit with a cotton bud soaked with
alcohol.
- Let dry for the required time.
- Withdraw the temporary axis from the assembly.

The gluing of the spacer.
|
|
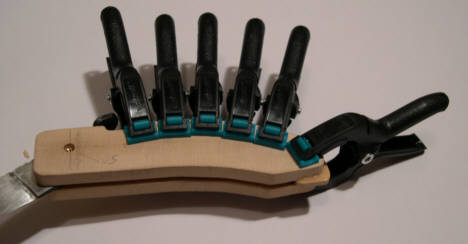
Grips for drying.
|
Assembly of the pins
 To assemble the pins:
- Turn the handle and drill with the good diameter (2
mm), by using the small holes as a guide.
- Cut 4 or 5 pins a little longer than necessary.
- Bevel one of the ends to facilitate their installation.
- Make some notches with the file to facilitate gluing.
- Prepare glue like above.
- Whitewash the pins of glue and insert them in the
holes using a mallet.
- Let dry for the required time.
- Cut or saw the excess (bevelled).
- Sandpaper the ends.
Working of the handle
 Put the blade with a temporary axis.
Make the outline of the end of the handle, by alternating
the closed position and the open position (to control). Leave a little
margin (some tenth) which will be removed during final sandpapering.
Put the blade with a temporary axis.
Make the outline of the end of the handle, by alternating
the closed position and the open position (to control). Leave a little
margin (some tenth) which will be removed during final sandpapering.
Remove the blade and the axis to work the area around the
pivot.
Work the thickness if necessary. Simplest is to keep flat the
two external surfaces. The support area of the pivote screw must remain
flat. You can decrease the thickness at the end of the
handle.
A this step, the section of the handle remains rectangular.
This step can require several assemblies and disassemblings.
No precipitation at the time of matter removal.

The folding knife in closed position.
|
|

The folding knife in open position.
|
Completion of the handle
 To finish the handle:
- Break the angles with a rasp or a grinder. See
the opposite picture.
- The completion will be done with the handle held in a vice
and with a long abrasive paper band, to have a perfect round shape.
- Work thus successively all the edges.
- Finish with a very fine paper (0,3/0 or 400 grit).

The folding knife in closed position.
|
|

The folding knife in open position.
|
- Treat the handle with
linseed oil
.
- Let dry.
Assembly of the knife
Assemble the blade and the final axis.
Use the knife a few times to run it. Possibly, to
use "Threadlocker" for a final assembly. you can also put one drop of oil on the pivot.


| | |