
Blacksmithing
and Cutlery
by Gérard HEUTTE


|
|
 Forge a Piedmontese blade

|
The "Piedmontese" is a model of folding knife simple to
realize (with a little of method), robust and practical at use.
For the practical and comfort aspects, I prefer the
models having of a lens or a pallet where the thumb can rest easily and
comfortably. This tutorial presents a possibility to produce
this pallet. Except the realization of the pallet, a blade of
Piedmontese does not present a particular difficulty.
Here, I make first the pallet then the blade. But, it
is completely possible to make the opposite. It is only a
question of personal liking.
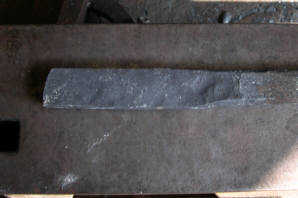
Flat part
It is first of all necessary to make a flat part of
adequate size. Attention, with the method suggested here, you
should not have a too low thickness at the risk of
encountering difficulties to make the
pallet! Keep a thickness of approximately 4 mm. If a finer
blade is wished, you can always decrease the
thickness after having made the pallet.
A width from 20 to 22 mm and a thickness from 4 to 5 mm are a
good base.
the section of origin (of C70 from "Acierie du Tarn" in 20x10)

|
|
The flat part obtained
|
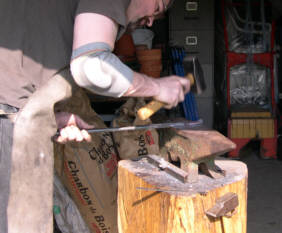
Pallet
This is the delicate part! It is necessary to
create a shoulder at the end of the flat part. If the thickness
is too low, you can create a fold instead of driving back the metal.
Pposition the flat part on the edge and resting against an
angle of the anvil. Flatten delicately. Correct the
least defect (twist, torsion, shift) as soon as it appears. Take care
to work quite hot (orange) because of the important
deformations of the metal. Forge on the edge regularly to
form a round or rectangular pallet.
The beginning.

|
|
The pallet starts to be formed.

|
The pallet is gently corrected.

|
|
If needed, idem for the flat part
|
The blade outline seen from profile...

|
|
and from the top.

|
Drawing out
 Now, it is necessary to finish the blade without
damaging the pallet!
Now, it is necessary to finish the blade without
damaging the pallet!
Draw out the metal to form a longer flat part.
It is now that you must act if a finer blade is
wished.
Blade
The rest of the blade does not present any
particular difficulty! I will illustrate the continuation by a
few phots. The bases are detailed in the tutorial to learn to
forge a blade .
 Small practical trick: Do not on to the blade. You will be
able to always make this operation at the end. In fact, I place
it systematically on one side!
Small practical trick: Do not on to the blade. You will be
able to always make this operation at the end. In fact, I place
it systematically on one side!
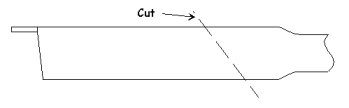
Then, cut the flat part to detach the blade. The
cut is done approximately at 60°. Bevel is made on the wrong way
i.e. the point diametrically opposed to the pallet. See sketch
opposite.
As the cut puts the tip at the bottom, it is now necessary to
"raise" the point.
A bit after the cut

|
|
The point went up

|
Working and completion
The blade is now shaped:
> Rectification of outline if needed.
> Creation of the edge.
Note: On this example, I have a bit "failed" the cut by
leaving too much matter! At the end, I have a blade which
makes 130 mm length. While making the edge, the blade would
have still lengthened by 10 to 15mm! I thus stopped the job
here. The blade edge will be finished with the file...
> Planing.
> Coarse completion with the file.
Here is the blade after the outline with the file. The
"small defects" were removed. The pallet was regularized.

Some particular points to check:
> The two faces of the blade around the (future) pivot must be
plane and parallel.
> The thickness of the blade must be maximum around
the (future) pivot.
And afterwards?
And afterwards, it is the great classic:
> Annealing
> Completion
> Drilling axis hole (see below)
> Normalizations
> Hardening
> Tempering
> Polishing
Then, it is time to switch to another tutorial:
Assembly of a Piedmontese folding knife .
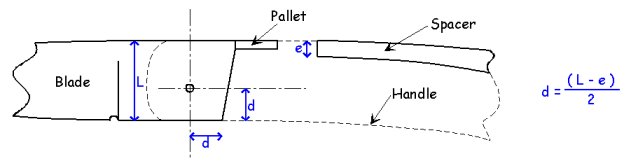
Drilling
The hole intended to
be the pivot is usualy drilled after annealing and basic completion...
With the major question: Where to drill?
Here is how I proceed:
(1) Choose the width of the spacer (e). In general, count 4 or 5 mm.
(2) I subtract (e) from the width of the blade (L), then I divide the result
by 2 to determine the distance (d).
(3) I position the pivot at the distance (d) from the bottom and the back of
the blade.
With a sketch, it is much simpler:
| | |