
Blacksmithing
and Cutlery
by Gérard HEUTTE


|
|
 Shaping a blade with file

|
Here is an effective method to make the raw grinding of
a blade with the file. This step, impossible to
circumvent, is made just after forging and annealing, before other heat treating.
The people "equipped" make this step with the backstand.
It is easier and more rapid! You can get the same quality
results by working correctly with the file!
Preparation
Before beginning the effective part of the work with the
file, it will be necessary to carry out two operations of preparation:
> Annealing
It is used to remove the internal tensions and to prepare metal for machining (filing).
> Remove calamine. Calamine is the black layer on the
surface of steel. To avoid wearing out the files prematurely, it is
advisable to remove it. The simplest method is to plunge the
blade for one night in the white vinegar: Simple, effective,
economic!
Tools
Here are what I advise:
> Good flat file, like bastard.
> Large round file for starting the tang.
> Small round (diam 3) for the notch on the edge.
> Special tool for the ricassos. Or, instead of that,
two metal bars and two screw clamps.
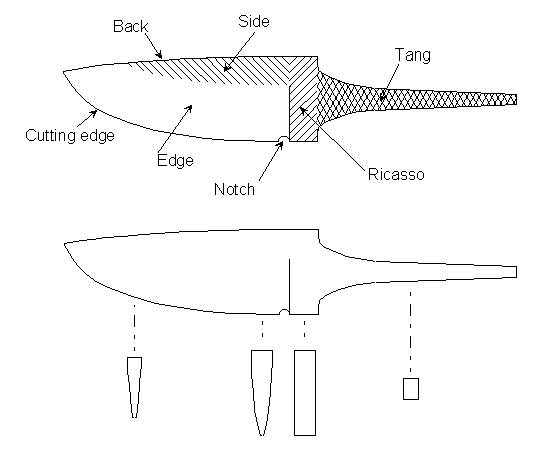
Blade form
To avoid disappointments during assembly, here is the
form of the blade to be obtained here. The important points will
be below detailed, in the step by step explanations.
Principle
Here are the steps list which will make
possible to arrive at the result:
> Outlining. In the order: Back of the blade, edge, tang.
> Surfacing. With in the order: Ricasso, tang, sides.
> Edge
> Completions: Breaking of angles, Notch, coarse polishing.
It is necessary to avoid touching anything at anytime!
When outlining is finished, the profile of the blade is the final one.
No need to come back there. Idem for the ricasso, once at the
good thickness, no need to work on it later!
A methodical process of work is one of the keys for a good
result.
Outlining
For all this part, you can tighten the blade in
a vice without particular precaution since the sides
have not been worked yet.
Back of blade
Begin by working on the back of blade.
Work in the length in order to avoid holes or to
leave bumps. Regularize by using the flatness of the file.
You must remove sufficiently matter to see the traces of the
file on the entirety of the back (i.e. no more forging traces).
Edge
When the back of the blade is correct, turn the blade
to work on the edge (profile), with the same method as above.
Attention to not be wounded with the tip of the blade.
Tang
 The tang will require a detailed attention.
First of all, it is necessary to understand well the
desired geometry (see figure opposite).
The tang will require a detailed attention.
First of all, it is necessary to understand well the
desired geometry (see figure opposite).
It is necessary to keep at the junction ricasso-tang, a small
flat part (from 1 to 2 mm in height). It is on this surface
that the future guard (or bolster) will take support.
The clearness of the unction ricasso-tang will depend on its
quality.
> On each side of the tang, machine the flat support of the guard
(in red on the sketch). Take care of
the alignment of the two sides of the tang. You can control it
constantly with a reglet.
> Cut the round-off (in blue on the figure) which will come
tangenter the flat. It could be necessary to cut a little in
the matter of the tang.
> Form the beginning of the tang (in green on the figure)
which will tangenter the round-offs. Then continue
towards its end.
NB : At this step,
you will not modify any more the outlining or profile of the blade except for the
notch to the edge-ricasso junction (if you wish to do one of
them).
Surfacing
Ricasso
The ricasso will have to be worked on each side of the blade.
Its faces will have to be quite
parallel. You can use a slide caliper or a
micrometer. Use the flatness of the file to ensure a good
flatness.
If the "level" must go down a little below that of the sides or the tang,
it doesn't matter. The difference will be
corrected later.
If one wishes a "raw forging" completion, it is
necessary to start from a well forged blade and to be make only a light machining.
Tang
Each face of the tang must be worked in the
length to ensure a regular reduction thickness and a certain
flatness (not too critical). Take care not to damage
the work made on the ricasso!
During the work on the two sides, attention to the
alignment of the tang on the axis of the blade. This step allows
to correct a light misalignment by removing more material on one side than on
the other!
Sides
The machining of the sides will be done mainly
in the length to ensure a progressive reduction of the thickness of
the blade. It is necessary "to be connected" to the work
made on the ricasso with a continuous surface.
Edge
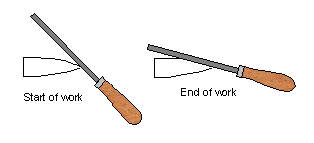 For working the edge, always start
by working with a rather large angle in order to outline a wire
centered well. Then gradually incline the file
to go up the working area towards the back of the blade and to thus
join the side. See sketch opposite.
For working the edge, always start
by working with a rather large angle in order to outline a wire
centered well. Then gradually incline the file
to go up the working area towards the back of the blade and to thus
join the side. See sketch opposite.
Mark
At the beginning, it will be preferable to trace
on the side the line who will be used as reference mark for the
Side-Edge junction. With the practice, you will be able
to do without this mark.
Ricasso-Edge Junction
It is one of the most delicate parts to make.
I strongly recommend the use of a specialized tool: the
ricasso screw
clamp.
Instead of that, you can replace this tool by two metal
flat parts maintained by screw clamps.
Support the smooth edge of the file against the ricasso screw clamp
begin the edge by strongly inclining the file (45°).
Work alternatively on the two sides of the
blade. It is necessary to arrive at the thickness desired for
the wire and to center this wire compared to the ricasso.
For questions of decarburization and mechanical resistance at
the time of hardening, it is necessary to leave a thickness on the edge.
In general, I leave a thickness of 0.5mm for the short
blades and 1 mm for the long blades.
Once the edge with the good thickness and well centered, you can
incline the file to refine the edge and to go up until the
mark.
The rest of the edge
For the remainder of the edge, proceed
in a similar way. Try to also work in the
length to have straight edge.
Completions
Breaking of angle
With a fine and soft file, remove all
the burs and break all the too sharp angles.
Notch
It is now the moment to cut the notch at the
edge-ricaso junction. Use for that a small round file. Do not dig too
deep. It is just necessary to separate the edge from the ricasso
to facilitate sharpening.
Tang
If needed, for example for a caulking at the end
of handle, round the tang towards its end. Start by
making a chamfer at 45° on the four edges to form a quite regular
octagonal section. Then round the octagone obtained.
Polishing
Before passing to heat treating, make a coarse polishing.
I use for this operation an
abrasive disc of 120 grit assembled at the end of drilling machine.
Result
 Here is a blade ready for the heat treating.
The ricasso and the sides were left "raw forged".
The surface quality of the edge is that of sandpapering with the
disc of 120 grit. The tang was not polished.
Here is a blade ready for the heat treating.
The ricasso and the sides were left "raw forged".
The surface quality of the edge is that of sandpapering with the
disc of 120 grit. The tang was not polished.
| | |